It’s mid-April, and my son arrives home from school with a homework assignment from his physics teacher:
“Over the next month, students will build their own Rube Goldberg machines from common household items. Your machine must include a series of 15 events in which motion or change occurs without human interference. Record two video segments, one explaining how the events in your machine work and one showing an unedited run from start to finish. Modest supplies may be purchased, if needed.”
In addition to a few other requirements, there is a note at the bottom of the page:
“Earn extra credit for extra events and/or creativity.”
It sounds like a fun project. Evan isn’t sure what he wants to build, but a month seems like plenty of time to figure it out.


Down The YouTube Rabbit Hole
YouTube is a great resource, as long as we can stay focused. Evan and I set off to do our own “research”. We agree to regroup in a few days to discuss what we find. I spent the next two evenings binge-watching every Rube Goldberg video on YouTube I could find.
A Rube Goldberg machine is an intentionally delightful waste of time and energy.
Jimmy Kimmel, May 10, 2017
Video: National High School Rube Goldberg Champions
Later that week, we watched our favorite Rube Goldberg videos together. What a blast! Most of the videos Evan picked featured machines created by teams of older students. As I listened to his feedback, I grew concerned about the scope of the project he was planning. We made a list of possible events and required parts before wrapping up for the evening.
Over the next week, I caught myself thinking about the project during the day and looking forward to discussing ideas with him after school. Each day, we collected a few items from around the house that we might use in the machine.


That Sinking Feeling
It’s about 2 1/2 weeks before the due date. We carry boxes of items down to the basement. Our plan is to build a couple of stand-alone events as practice. It starts off as a fun way to spend an evening, just playing around and exploring ideas. But after a few hours, we came to some sobering realizations.
Completing any of Evan’s big ideas will take enormous effort. The thought of repeatedly walking around the room to reset after a failed run isn’t appealing. And tracking fast-moving objects while recording on my iPhone proves difficult. Our test footage is far from the awesome video we had envisioned. My son’s enthusiasm from the start of the evening wanes, and he looks disheartened by the time we go to bed that night.
Renewed Hope
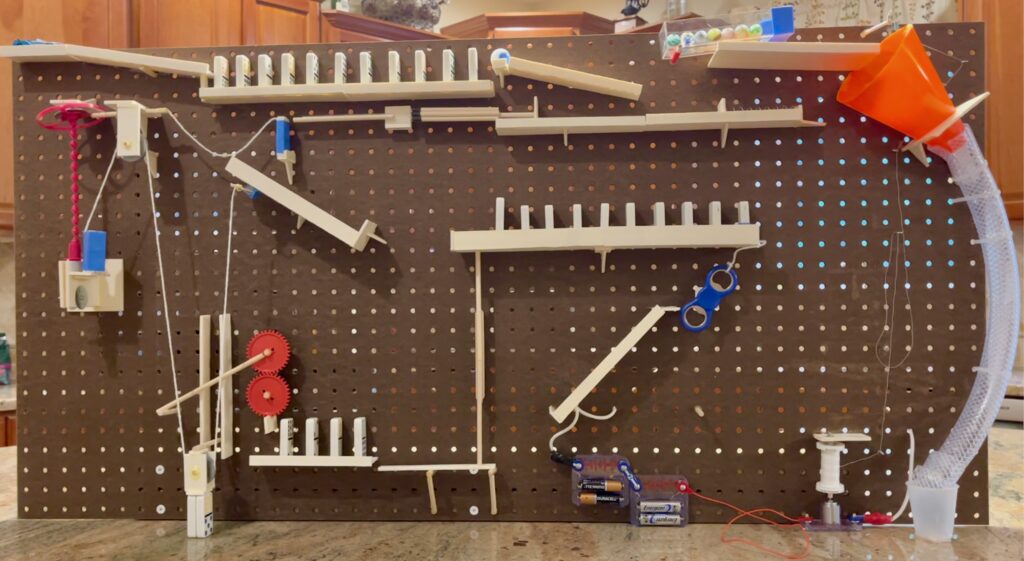
The next morning, we discussed what we had learned the previous night. Are we taking the right approach? Most students doing this project build events around their rooms. But a couple of the videos featured machines built on a wall or wooden board. Our conversation narrows to building a machine on a pegboard.
Building on a pegboard has several advantages. Its compact size will make it easier to reset after failed runs. We can also relocate somewhere in the house with better lighting for video recording. If planned correctly, the entire machine can be recorded without moving the camera. The only downside might be the limited amount of space on the board. We’ll have to plan carefully to fit everything in.
Things fall into place quickly as Evan remembers that we have an old pegboard in our garage. A quick scavenger hunt to Lowe’s uncovers some scrap wood to make a base ($0). And a trip to the local dollar store scores us some inexpensive craft boards, wood dowels, and one whimsical item that we hope to include in the project ($6.50 total). In that moment, hope is restored.


Ground Zero
I give Evan the OK to set up on our kitchen island and cross my fingers that my wife won’t kill me when she gets home. We expect things to be a little messy for a few days. In reality, our kitchen will be a complete disaster area for the next two weeks. Evan’s initial estimate of 20 hours eventually balloons into 60 or more hours of painstaking work. There are numerous failures, partial tear-downs and rebuilds, and countless resets of the machine to get everything right.
The kitchen proves to be a good choice for lighting and camera work. I opted to record all videos in 1080p at 60 frames per second. We captured some great-looking video for his assignment. Playing back the video in slow motion also helps troubleshoot when things aren’t working as planned.
A Parent’s Perspective
Evan and I have a good relationship, but at 15, he’s becoming more independent by the day. The father-son moments we once shared are more fleeting. I’m not sure what prompts me to do it, but I started taking pictures at the very beginning of the project. My son is quite camera shy, so most of the photos are taken over his objections or when he isn’t looking.
While my son is pretty handy with tools, I still supervise when power tools are required. It’s probably a good time to remind everyone to wear safety glasses and check with a parent before firing up that drill. I also enjoy helping when Evan needs an extra hand, except for one moment during this project when he accidentally hot-glued my fingers to a board.
My son successfully completed the project, and I’m very proud of the effort he put into it. There was a lot of fun, a lot of frustration, and no guarantee of success. In the end, it was about the willingness to explore crazy ideas, learn from failures, and try again.


Start of Something New
During the course of this project, we found ourselves coming up with dozens of ideas that Evan simply couldn’t build in the time available. Even though our first attempts were modest, we also discovered that we really enjoy making videos. To give us an opportunity to explore our crazy ideas and share them with others, we are launching a new YouTube channel in early July. The channel will include a photo montage from this project, a full run of the machine, slow-motion playback, and a video close-up of the individual components.
We are already designing our next Rube Goldberg machine, which will be the basis for a series of tutorials on how to build pegboard-style machines. The Rube Goldberg Machine is a popular project for high school physics and engineering classes. We hope to give students a head start on their projects while inspiring them to go even further with their ideas. As we learn, we’ll share the tools, techniques, and materials that we use.
This blog will have updates on our progress, including some behind-the-scenes photos. We look forward to sharing more details in the months ahead.
Update: July 1, 2023
The Whimsical Widgets YouTube channel is now live with our first three videos.